Terrarium 101 :: A Guest Post

Today we have a special guest, an expert on small houses and plants.  Read on and you’ll discover one of her secrets.

terrarium close-up
Hi Nesters! This is Jessica from My House Party here to share a little how-to on making a terrarium for your home, or the home of someone you love. Terrariums are a great way to bring the outdoors in and fairly simple to assemble and easy to maintain. Let’s get started!
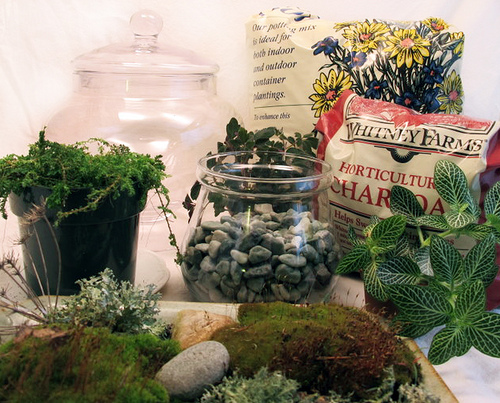
terrarium-supplies
WHAT YOU WILL NEED:

  • apothecary jar / where to find it: thrift stores, garden boutiques, craft stores
  •  rocks / where to find it: your driveway, craft /dollar stores
  • charcoal / where to find it: garden centers, aquarium shops
  • potting soil / where to find it: any garden center
  • AND LIVE PLANTS::
    • small low-light plants / where to find it: garden centers
    • moss / where to find it: your backyard, garden centers

terrarium-soil
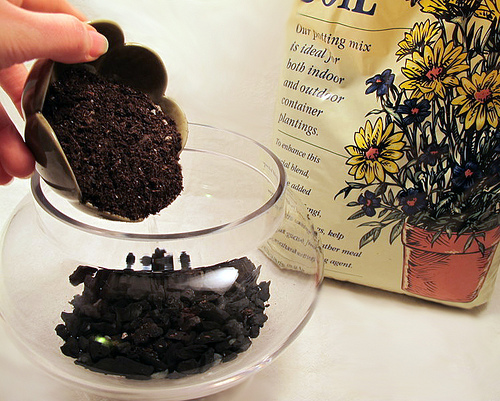
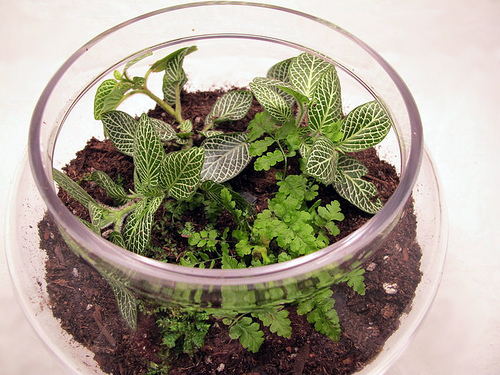
LET”S LAYER! Find a good spot inside or out to assemble your terrarium. Make sure your jar is squeaky clean so once finished you can see all the wonderful things growing inside. Now, grab a handful of your rocks and carefully drop them into your jar at least 1” deep. The rocks ensure proper drainage. Next, add the charcoal. Charcoal is messy so I recommend pouring straight from the bag or getting something to scoop with. You just need to cover the rocks a ½” or so. The charcoal will filter the water and prevent stagnation. Now it’s time to add your potting soil. If we were just adding moss we would only use about 1″ of soil. However, since we’re going to be using some nice little moisture loving foliage we will need enough soil for proper root growth, so about 2”- 3”.

terrarium-layers
Here’s what your layers should look like. And don’t worry if a little soil gets into the rocks. No one’s going to be looking at that once we’re done.

terrarium-plants
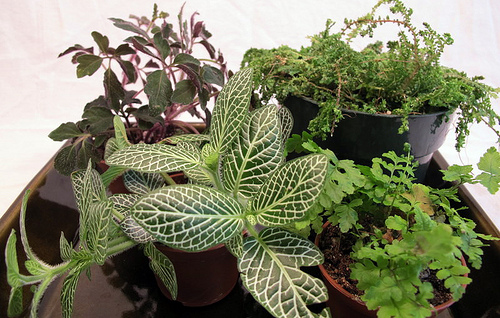
NOW FOR SOME PLANTING! We will add our rooted low-light plants first. These will give some height to our terrarium as well as the possibility of color/shade variation. Make sure you purchase small plants that are meant to stay small. Mini ferns are a popular choice, and if you have a large enough jar you can even add in some flowering begonias. After considering your plant placement (groups of three are always nice) use your hand to scoop a small pocket in the soil you just laid down. Then removed your first plant from its pot and loosen up the roots a bit. Try to spread the roots out to grow more horizontally if you have a shallow jar. Place your plant in the pocket you dug and cover its roots and base with soil and pack down firmly. Repeat process with any additional plants.

terrarium-planted
LOVELY! At this point, you can either be done with the planting piece and simply add some more rocks to cover the dirt and be finished or…we can keep adding green. I am all about a little variety so let’s move on.

terrarium-moss
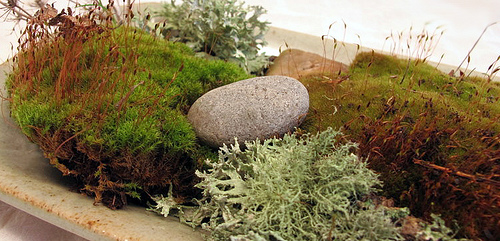
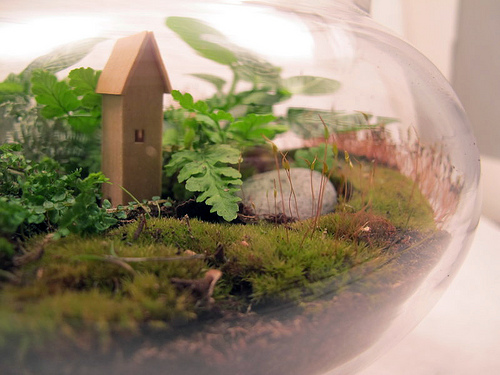
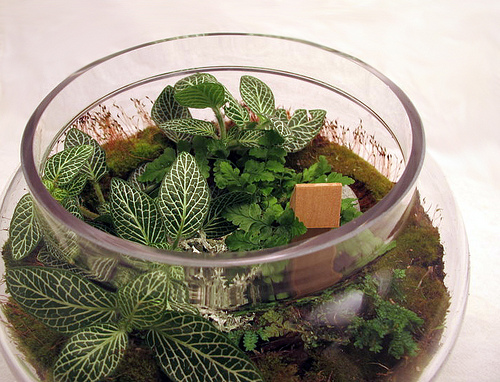
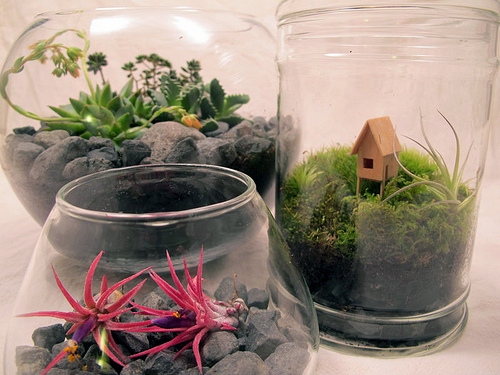
FORAGING. Take your pieces of mossy clumps and tear them to fit the shapes you need to cover up the bare soil left in your terrarium. Then nestle them snugly in. Add found stones and/or other accessories to add some wonder to your terrarium. (We like to add tiny houses!) Pour in a shot glass or two of water, put the lid on and you’re done!

terrarium-done

terrarium-lid
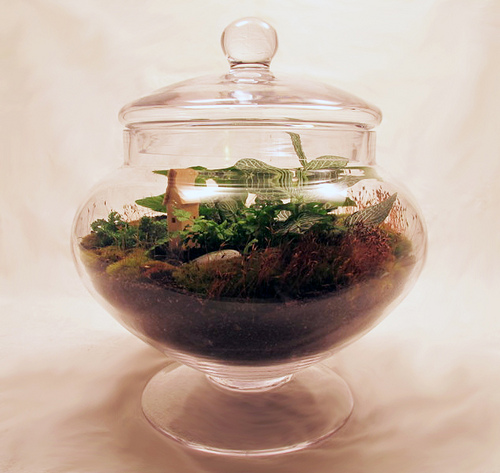
TIME TO ADMIRE. Place your new green-glassed beauty in a spot in your home where it will receive indirect light. Check the moisture level every week or so and give a good spritz or shot of water if it seems a little dry. A little condensation is ideal but be careful not to over water.

other-terrariums
EXPLORE: Now that you are a terrarium master you can explore all kinds of glass enclosed options. Try some open top jars for a ‘dry terrarium’ filled with succulents, or an ‘air terrarium’ with some stones /sand and air plant or two. Oh, the possibilities.

Thanks so much Jessica for taking the time to teach us how to make a beautiful terrarium out of one of those apothecary jars that most of us already have around our home.  I love this project and so do my boys, they’ve been known to stick a few plastic dinosaurs into our terrarium.  If you are looking for one of those mysterious air plants, you need to visit the My House Party Etsy Shop, or their  Big Cartel Shop for even more choices and those charming tiny houses.  I mean, really, does it get any easier than AIR?  Even if you have no thumb you should be able to grow those. No more excuses!

Related Posts with Thumbnails

Comments

  1. As a brand new blogger 2 years ago, I posted a similar tutorial and it has been the most popular post I’ve ever written. People still hit it! I guess it goes to show that we love to grow things, all we need is to learn how :)

    Great tutorial and I love the terrarium with the succulents…might have to make another!

  2. cindy says:

    So I can actually have some real, live green stuff in my house and not kill it? Interesting…..now all I need to do is re-buy all the apothecary jars I used at my daughter’s wedding and then promptly sold.

  3. tinam says:

    Great tutorial! I did two terrariums a couple of years ago. One for my kitchen and one for my office. They are great attention getters! I used some beach glass type colored glass and also some colored aquarium gravel which I layered in with soil. Adds some color in. I did not use moss, but I love that idea. In fact, I think it is time for a new terrarium!

    I like to use those big glass jars (look like cookie jars) that Target carries, the ones that lots of people use as canisters.

    Thanks for the ideas!

    tina

  4. Thank you for sharing how make these. I love live plants in my house and will be trying my hand at one of these pretties!

  5. Suzanne says:

    Thanks so much for this tutorial. I love the look of these. Definitely something I want to try!

  6. Simply love the tiny house…gives the whole thing a fairytale whimsical look.

  7. Kelli says:

    Those little houses are adorable! And I can imagine that if I have a terraium, my boys would be putting their dinosaurs in it too:)

  8. Amber P says:

    Oh my! I LOVE this idea! I’ve been wanting to provide some greenery in my home! Thanks for the post! I MUST try this! :)
    amber @ itsgreeneroverhere.blogspot.com

  9. bj says:

    These are just beautiful…can’t wait to try it.
    Thanks so much…

  10. TY TY TY!!! I love these but had no idea how to put one together!! I am on the hunt for the perfect jar — oh maybe cloche????

  11. shelly says:

    Hmmmmm…I end up killing all of my plants….maybe this is the wat to go! Very spring-y!!!

  12. Catie says:

    They are beautiful! And you make it look so easy! I’m working on developing my green thumb – it’s going ok.. I may have to wait to try something like this!! I love it, though!!!!

  13. Anita says:

    Thanks for the great post! I remember my sister making a huge one years ago in high school. This is so nice and compact and can be put in many places!
    ~anita

  14. LindseyBear says:

    I just wanted to comment that this was a really great post! Great Tut, easy to follow, perfectly illustrated all the way! I never knew terrariums were so simple! I can wait to try a couple now!

  15. Evielena says:

    Oh! I love this!!! And such a great tutorial. I’m going to try this very soon–I’ve always wanted my own terrarium. The house is just adorable and I can imagine a little fairy living in the terrarium… :)

  16. Pam Fitz says:

    Thank you! I was just trying to gather all of the ingredients to make Martha’s “fairy garden” terrarium over the weekend
    http://www.marthastewart.com/article/fairyland-terrarium
    but I haven’t had any luck finding the horticultural charcoal.The home depot guy told me I didn’t need it, but after reading this I think I better hold out for some. Maybe a nursery center would have some? Any idea where I could order a small amount online for a good price?

    • Chris Handy says:

      you can find the charcoal at pet shops where they sell fish for aquariums. Also….am wondering…if I have a lid for my terrarium how often should I take it off? Am afraid thte plants will grow mold if I don’t. Please advise. Thank you. Chris

  17. Marty says:

    They are beautiful. I love them all. What a great tutorial. Thanks. Hugs, Marty

  18. I love terrariums. Sadly, my attempts last year were not successful. I know … Loserville. Mine developed some sort of mold and there was too much condensation. I realized I had overwatered, but no amount of neglect or leaving the top off reversed the damage.

    I can’t help it. I overwater. I am the plant version of a hovering mother.

  19. So much fun!

  20. I remember making a terrarium when I was in 5th grade! I loved it! I think my kids will really enjoy doing this! Thanks!

  21. Virginia says:

    Thanks for this great tutorial! Making a terrerium has been on my mind for a while. I’m sure my son will adorn with dinos too!

  22. MarytheKay says:

    I LOVE this idea! Thank you so much for such great instructions. I am definitely going to do this!

  23. Tiffany says:

    Cute, I wonder if these will survive my black thumb

  24. Gussy says:

    LOVE THIS! I see them everywhere online and I need to sit down, take the afternoon off from sewing {duh}, and make a few. CUTE! Or I’ll just buy one because I love to receive packages.

    He he :]

  25. Miss Mac says:

    Beautiful! Last month I threw together a pretty basic one in a Kerr jar. Not as fancy, but still cute on a windowsill. http://littlemacshack.blogspot.com/2010/02/bright-spot-on-snowy-day.html

  26. jane says:

    this makes me want to try it! easy tutorial and great photos! thank you! jane

  27. We’ve been studying plants in homeschool and made a terrarium a couple weeks ago. It turned out so beautiful that I put it on our mantel!

  28. Melanie says:

    Oh.my.goodness! I have SOOOO been wanting to make a terrarium & have some perfect jars for it! Thanks for the excellent & pretty “how-to”! Can’t wait to get all of the ingredients & give it a whirl! Thanks a bunch!!

  29. leila says:

    YAY! i love terrariums! projjecttt for this weekend! :)

  30. Leslie says:

    Beautiful and verdant!
    Thank you for the idea!
    I think I hafta take a trip to Lowes…

  31. I totally love this idea. I am so excited to find something else to put in my apothacary jars!!! I also plan on dragging my husband to Lowes today to get the charcoal and moss, I have everything else. Yea Me!!!!!!!!!

  32. Kayla says:

    I loved this post! The tutorial was thorough and easy to follow. I used it this week to assemble my own terrariums for the first time. They look so lovely on our coffee table. Such a fun way to bring the “outside” into our apartment. You can check it out at http://thesaadehfamily.blogspot.com/2010/03/playing-in-dirt.html
    Thanks!
    Kayla

  33. AprilG says:

    I really want to make one of these. I would like to share this post with my readers.

  34. Paulina says:

    This is the COOLEST and CUTEST thing ever. I am going to make one when my midterms are over.

  35. Jill says:

    Great tutorial! Always loved terrariums and made a few when I was a kid. Can’t wait to get started. Thanks!

Trackbacks

  1. Social comments and analytics for this post…

    This post was mentioned on Twitter by myhouseparty: check out my guest post on building a terrarium over here: http://bit.ly/cx0JC4

  2. [...] Indoor Terrarium , why yes please. I would love to have pet plants. [...]

  3. Terrarium says:

    [...] reading this great guest post on The Nesting Place, I realized that I never blogged about my adventures in making my own [...]

  4. [...] want to make a terrarium centerpiece for my kitchen (@ Nesting [...]

  5. [...] of myhouseparty (really cool & cute, btw! My friend bought me one :D), and my discovery of this AWESOME terrarium how-to blog post. I’m gonna build my own terrarium this summer, not sure when, but I’m going to. Until [...]

  6. [...] are step by step instructions from The Nesting Place, a blog that says that it “doesn’t have to be perfect to be [...]

  7. [...] If you want to make your own if you google diy terrarium there are hundreds of awesome blogs sharing- here is one cool one that I found…..thenester.com [...]

  8. [...] and I looked at a couple of different websites to figure out how to build it. Both Indie Fixx and Nesting Place give great instructions, very similar to how we created ours. Here’s what we [...]

Speak Your Mind